
Mechanical Plunger
|

|

|

|
FEATURES:

|

FEATURES:

FEATURES:

FEATURES:

|

FEATURES:

|

The Bowers Universal Gauge’s ingenious modular design enables it to be quickly configured to suit almost any measuring challenge, both internal and external. The Universal’s clever constant measuring pressure device ensures accuracy and consistency of reading.
A large variety of measuring contacts and adaptors are available for the Universal Gauge enabling countless measuring tasks to be completed with ease. Accessories for the measurement of threads, grooves, splines, gears, hole centers and many others are available as standard and special adaptations for more non-standard applications can be quoted on request.
FEATURES:

FEATURES:

|

FEATURES:

|

|

|

|

|

|

|

|

The new MicroGauge 2-point bore gauging system has been designed specifically for the measurement of small bores between 1.0-6.0 mm. Featuring a completely new digital readout and extremely compact overall dimensions, the MicroGauge is truly a pocket-sized instrument. Digital readout and measuring head together are about the same size and format as a ballpoint pen which represents a big advantage for those needing to measure small precision parts and who need to have their gauge with them all the time.
FEATURES:

|

|

FEATURES:

FEATURES:

FEATURES:

|

|

|

|

|

|

Multi-start threads
Multi start threads are used where quick axial travel is desired with less rotation. These are also used for threads which cannot have coarse pitches due to metallurgical constraints. In comparison to single start threads, multi start threads can accept higher axial thrusts for restricted angles of rotation, the efficiency is high, the tendency to locking is reduced. Multi start threads are commonly used in power transmitting screws, valve spindles.

Baker manufactures hole location plugs as shown. These are used to measure & check the location of small tapped holes. This is a perfect gauge to inspect features for run-out to the pitch diameter of the threads. These give a firm locating grip without pulling the shoulder of the plug up against the hole face thus avoiding squareness errors.
Hole location plugs are commonly used to measure the location of tapped holes. It is difficult to accurately measure the location of tapped holes using conventional methods; i.e. CMM’s or indicating type instruments. Hole location plugs are deliberately manufactured with Pitch diameter over-size, then slitted, resulting in the threaded section collapsing while being screwed in the threaded hole. The hole location plug will screw in tightly, locating on the Pitch diameter of the tapped hole. A measurement can then be taken from the datum point to the cylindrical diameter on the hole location plug to determine location. For very small sizes, the plug is not slitted but the thread is manufactured with a gradual taper, which will lock up on the thread.
Positive grip on flanks regardless of hole size.
Shank diameter 6.35 mm is maintained within ± 0.0025 mm.
The shank is concentric to the threaded portion within 0.0025 mm.
Available in Metric & Unified Sizes.
Metric Sizes M6 & above are slitted.
Unified Sizes No 12 & above are slitted.
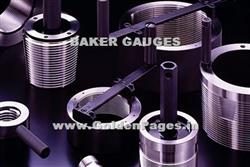
BAKER has collaborated with KURODA PRECISION INDUSTRIES, a leading Japanese thread gauge manufacturer, to distribute their high quality API thread gauges in India. KURODA has been granted the right of use of API Official Monogram for the following API Thread Gauges since 1957; Specification 5B under the License no. 5B-0015, Specification 7-2 under the License no. 7-2-0187.

Baker has collaborated with Spline Gauges of England to bring spline plugs and rings to the Indian market.
Spline Gauges is the world’s leading manufacturer of spline gauges and master gears. Its customers include leading global companies and their suppliers in the automotive, defense and aerospace industries, their OEMs and the precision engineering companies which support them.
Go and No Go spline rings, plugs and master gears are their speciality.
Together, we also offer:
Taper master plugs, straight/helical
Gear Artifacts
Spline plug and ring, straight/helical
Helical and spur master gears
Spline indicator ring and plug gauges
FEATURES:

|

|

Specifications
Range available:
Min. diameter : 10mm
Max. diameter : 300mm
Max. tooth length of component : 300mm
Concentricity Tolerance:
Between outside diameter and spline pitch circle diameter : 0.005mm
Notes:
To use this gauge, the component under testing is mounted on centers while the concentricity ring is clamped onto it. The outside diameter of the ring is concentric to the pitch circle diameter. This means that, with the aid of a runout checking device—for example, dial indicators or transducers—the component’s datum faces or diameters can be inspected.

Taper tooth master plugs with fit and wear lines beautifully exemplify Spline Gauges’ exacting specialty engineering. These are used to monitor the wear of ring gauges during component manufacture. The ring gauge is ground to fit the master plug for original and replacement ring gauges.

FEATURES:

FEATURES:

FEATURES:

FEATURES:

FEATURES:
FEATURES:

FEATURES:

|
FEATURES:

|

|

|

|

|

|

FEATURES:
NOTE
If clear line of sight, between antennas of WTs and WR is interrupted, then one or more WRPs will have to be introduced
Number of WRPs that will be required for a networking project, cannot be ascertained at the beginning, and can be fully determined only during installation and commissioning

Our customised multi-gauging solutions range from a simple multi level diameter checking to relational parameters like squareness, center distance etc. to Semi-Automatic to completely automatic inline multi-gauging machines. The process of realizing a customised gauging solution in reality is a complex and elaborate one. It consists of the following steps.
The customer plays an important role in this process. Each machine is one off and highly customised. It’s a whole new ball game each time. We believe the customer is the expert in manufacturing the part and can provide valuable inputs. Such a collaborative effort from both ensures a one way passage to success.
Over the years, we have manufactured many customised gauging solutions for a variety of components. Many of these solutions have become industry standard. This has been achieved through in depth Application Engineering exercises that we have carried out to understand the component and the manufacturing processes. This gave us the cutting edge needed to deliver total solutions to the satisfaction of the Customer. As a part of continuous technology development, the company also has developed expertise in computerised gauging with semi-auto and fully automatic gauging machines.
The following tips are useful when you send your requirement to us:
While specifying requirement, please give the complete drawing with all the dimensions to be measured properly highlighted, to our sales representative.
It is strongly recommended to give us a sample component and 3D model also, because what the drawing may not reveal is disclosed by the actual component and 3D model. Size, shape and weight gives a lot of information for designing a good gauge.
The gauge acceptance criteria should be discussed and agreed upon at the very beginning.
When ‘General Layout’ is sent to you giving overall scheme of gauging, please go through it carefully. If you have any suggestions, communicate to us as early as possible. Reconfirm all the dimensions carefully because in the interim period your drawing or process may have changed.
Please give sufficient time to manufacture. These projects are one off type.
During gauge installation, ensure that your operators who are going to use the gauge are properly trained in the usage.
|

|

|

|

|

|

|

The world today is moving toward Statistical process control techniques at a lightning pace. It is likely that in the near future, the use of statistical process control is mandated in the automobile industry. In order to keep its customers at par to international requirements, Baker Gauges has developed Q-Soft a simple yet effective data acquisition and SPC software, which can be easily installed by anyone, ranging from a small workshop to a big organization. It is as simple as plug and play.